FFDGoss20
Member
I will begin the upfitting of my 2013 Chevy Tahoe SSV very soon. I wanted to create a thread that I can update, so here it is.
I am the fire police captain at my fire department, as well as an active firefighter. This vehicle will be used to respond to the fire station, as well as directly to incidents.
To begin, I bought this vehicle used off a dealer in Chicago. It had about 61,000 miles on it, and was formerly owned by the federal government. It did have warning lights and 1 NMO mount antenna installed at some point, but all of that equipment was removed before it was sold to me. Since all of the panels, headliner, etc. Have been removed at least twice already, I will not be starting the build until I have ALL of the equipment I intend to install in my possession. I have put a list of equipment below. Anything that has a "*" at the end of it means that it is filling holes that were made when the previous equipment was installed. All emergency lighting will be RED in color except for the amber traffic advisor.
ROOF:
Whelen Liberty 48" with high intensity takedowns (removed from my former vehicle)*
Low band NMO antenna (will be replaced when our county 911 converts to UHF sometime next year)
NMO scanner antenna
NMO mount sirius/xm radio antenna*
FRONT:
Go Rhino 5160 light ready push bumper with two Whelen Ions
Whelen Vertex in DRL*
Whelen driving/warning light mounted in fog light area
2 Feniex Triton speakers on fabricated brackets similar to Whelen SAK24
Whelen ULF44 flasher
SIDES:
Whelen Ions behind rear glass*
Unknown Whelen light on running boards (2 per side)
Whelen ULF44 flasher
REAR:
Whelen TAD8 Traffic Advisor
Whelen Vertex in upper portion of taillights*
Whelen Ions on license plate bracket*
Whelen ULF44 flasher
CONSOLE:
Havis 24" console with Tahoe specific mounting base
Motorola CDM1250 low band radio
Uniden BCD996P2 digital scanner
Uniden 980SSB CB radio
Feniex 4200
Havis dual cupholder
Havis 6" lockbox
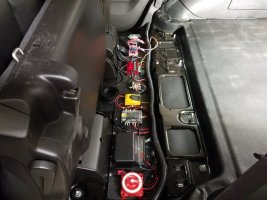
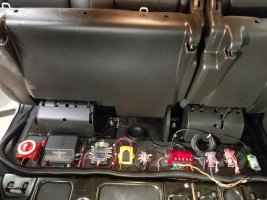
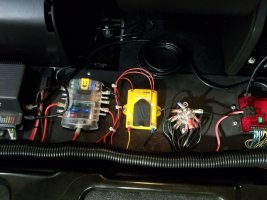
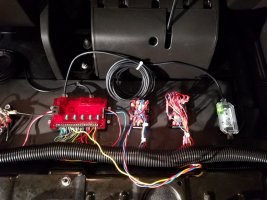
UNDER REAR SEATS:
Blue Sea dual circuit battery switch
Blue Sea fuse block
Havis Charge Guard
Feniex Storm Pro 200 watt
Since this is the Special Services package, the vehicle came from the factory with a headlight/taillight wig/wag system, a unity spotlight on the drivers side, and various upfitter wiring harnesses.
If you noticed, their will be three Whelen ULF44 flashers. This is so I can sync all of the emergency lighting a little easier, dim them at night, and make them 2 mode lights. While responding, the lights will have a faster flash pattern. When parked, the flashers and Liberty lightbar will go into "mode 2" which will be a much slower wig/wag type pattern. Shifting the vehicle into park will also shut off ANY white flashing lights on the vehicle.
Please feel free to share your thoughts and concerns, and ask any questions you may have. I thank everyone in advance for any advice or help with the project.
I am the fire police captain at my fire department, as well as an active firefighter. This vehicle will be used to respond to the fire station, as well as directly to incidents.
To begin, I bought this vehicle used off a dealer in Chicago. It had about 61,000 miles on it, and was formerly owned by the federal government. It did have warning lights and 1 NMO mount antenna installed at some point, but all of that equipment was removed before it was sold to me. Since all of the panels, headliner, etc. Have been removed at least twice already, I will not be starting the build until I have ALL of the equipment I intend to install in my possession. I have put a list of equipment below. Anything that has a "*" at the end of it means that it is filling holes that were made when the previous equipment was installed. All emergency lighting will be RED in color except for the amber traffic advisor.
ROOF:
Whelen Liberty 48" with high intensity takedowns (removed from my former vehicle)*
Low band NMO antenna (will be replaced when our county 911 converts to UHF sometime next year)
NMO scanner antenna
NMO mount sirius/xm radio antenna*
FRONT:
Go Rhino 5160 light ready push bumper with two Whelen Ions
Whelen Vertex in DRL*
Whelen driving/warning light mounted in fog light area
2 Feniex Triton speakers on fabricated brackets similar to Whelen SAK24
Whelen ULF44 flasher
SIDES:
Whelen Ions behind rear glass*
Unknown Whelen light on running boards (2 per side)
Whelen ULF44 flasher
REAR:
Whelen TAD8 Traffic Advisor
Whelen Vertex in upper portion of taillights*
Whelen Ions on license plate bracket*
Whelen ULF44 flasher
CONSOLE:
Havis 24" console with Tahoe specific mounting base
Motorola CDM1250 low band radio
Uniden BCD996P2 digital scanner
Uniden 980SSB CB radio
Feniex 4200
Havis dual cupholder
Havis 6" lockbox
UNDER REAR SEATS:
Blue Sea dual circuit battery switch
Blue Sea fuse block
Havis Charge Guard
Feniex Storm Pro 200 watt
Since this is the Special Services package, the vehicle came from the factory with a headlight/taillight wig/wag system, a unity spotlight on the drivers side, and various upfitter wiring harnesses.
If you noticed, their will be three Whelen ULF44 flashers. This is so I can sync all of the emergency lighting a little easier, dim them at night, and make them 2 mode lights. While responding, the lights will have a faster flash pattern. When parked, the flashers and Liberty lightbar will go into "mode 2" which will be a much slower wig/wag type pattern. Shifting the vehicle into park will also shut off ANY white flashing lights on the vehicle.
Please feel free to share your thoughts and concerns, and ask any questions you may have. I thank everyone in advance for any advice or help with the project.