Neat trick for installing HAWs...

C2Installs

Member
May 24, 2010
477
Tennessee
Installing HAWs in headlight housings has become more difficult with newer composite headlight designs. Often the host reflector is contained inside an outer shell. This dual-wall design makes installing HAWs tough and requires the upfitter to drill two holes, one bigger access hole in the outer shell and a 1" mounting hole in the reflector. Since the headlight is a sealed unit, it becomes necessary to "plug" the access hole to keep out moisture and elements. Plugging is done in a variety of ways but most commonly by using the cut-out plastic blank from the hole saw. But, the fit is often off because of the amount of material remove by the hole saw. I have come up with a different method and think it is a better way to roll.


If you are familiar with Jotto Desk laptop mounts then you have seen the round foam adhesive disks that they use to pad the laptop platform. They are a bit less than 1/4" thick and 1 1/2" in diameter with 3M adhesive on the back side. I have a small stock of them on hand because they are useful for a lot of things...like leveling out dashlights for example. I have also found they make an ideal plug for the above described access holes.


The access hole size I prefer to drill is 1 1/2", made with a standard bi-metal hole saw. This is the minimum size needed to just barely allow for the HAW to be inserted due to the size of the HAW's mounting flange. Both screw-in strobe and LED HAWs can be accommodated this way. The access hole saw is used to just start the HAW mount pilot hole, locating it dead center of the access hole. Then I use a 1" step bit to drill out the mounting hole. After cleaning up any debris, I mount the strobe.


To use the foam plug, I make the hole for the wires. For strobe HAWs, I have to make three separate small holes due to the way the wire exit the back of the bulb. I then unpin the AMP connector using a proper tool and feed the wires through the plug, sticky-side towards bulb. For LED units, one hole is fine, but you will need to make a radial cut through to the edge of the foam plug on one side because of the in-line flasher. Once wires are fed, remove the backing paper from the adhesive side and push the foam plug down to the bulb, seating it. The adhesive holds it in place. Depending on how deep your reflector is in relation to the access hole, you may need to stack the foam plugs, sticking them on top of each each other. Finally, seal it all up with RTV silicone and let it set up.


That's it and here are the pics to show you what I mean. This was done on a 2011 GMC Sierra. BTW, the debris clean-up on these sucked in a way few things have sucked before.


[Broken External Image]:http://i499.photobucket.com/albums/rr351/C2Installs/IMG_0231.jpg


[Broken External Image]:http://i499.photobucket.com/albums/rr351/C2Installs/IMG_0233.jpg


[Broken External Image]:http://i499.photobucket.com/albums/rr351/C2Installs/IMG_0235.jpg


[Broken External Image]:http://i499.photobucket.com/albums/rr351/C2Installs/IMG_0239.jpg


[Broken External Image]:http://i499.photobucket.com/albums/rr351/C2Installs/IMG_0240.jpg


[Broken External Image]:http://i499.photobucket.com/albums/rr351/C2Installs/IMG_0245.jpg


Anyway, give it a shot. I think it works great, looks good, and is easy to do.
 
May 25, 2010
7,072
Tunkhannock, PA, USA
I like it C2... :thumbsup: Can you buy those foam disks somewhere...?


Oh, and is there an advantage to using a step-bit instead of a 1" hole saw for the HAW hole...?
 

C2Installs

Member
May 24, 2010
477
Tennessee
Boulder,


I think there is. In fact, there is only one step bit I use. I had a pretty long post about it at one of the previous boards. While nothing really helps with the ceramic?e composite headlights and their hideous, horrific dust, the step bit I use is awesome for everthing else plastic. It cuts quickly and in softer plastic it creates a continuous "apple peel" instead of a bunch of chips, dust and slag. Clean-up is quick and easy. This is because it is hella sharp and uses two flutes instead of one. It steps from 1/4" to a true 1". The bi-metal wood-type hole saws are never truly round, catch and tear plastic, oversize the hole, and create lots of chips. I never liked step bits for HAWs until I found this one, and now I'll never go back to hole saws except where I need an access hole like described above. Trust me, there is nothing better, I've tried them all. I converted a few folks to them with my previous post.


Anyway, here it is: http://www.toolfetch.com/Brand/Evolution_Power_Tools/Bits/SD-10.htm


It's a bargain at $26.00 and I think I'm gonna order a couple more just to have around.


Oh, you'll have to call a Jotto dealer or Jotto themselves up to get those foam spacers.
 
May 25, 2010
7,072
Tunkhannock, PA, USA
I'll have to try the step bit method the next time we ho HAW/LAWs...


Also, I know craft stores sell an adheisive backed foam... I wonder if they have a range of thickness'...? Then you could cut your own...
 

C2Installs

Member
May 24, 2010
477
Tennessee
Boulder,


Don't just try any step bit. I had terrible results with most that I tried. Whatever one you use, make sure it is sharp and has two flutes. My HAW bit is used only for HAWs to keep it sharp. I like the one I linked to because it makes a one inch hole...most of the ones at Lowes/Home Depot/etc. like Irwin and Greenlee brands go to 1 1/8" inch or bigger, so there is a risk of oversizing the hole. The only drawback to the one I recommend is that it is long and needs depth in the light housing to avoid hitting the outer lens. I plan to have one of the bits cut down by an inch or so, and use the full length one to start the hole and then the cut-down one to finish.


Seriously though, the above bit is a great product and the best I've seen a a great price. It comes with a protective storage tube, too. I actually think I'm gonna order one of each size tonight. Tool Fetch was easy to deal with last time I ordered.
 
Nov 21, 2010
440
Pelican Rapids, MN
I also use a true 1" step bit for HAWs with great success.


C2- Did you remove the rubber grommets that surround the high and low beam bulbs on the Sierra housings? I find that with these removed the debris cleanup is much much easier. I also vacuum while drilling just like the dentist. Thanks for the foam pad trick. I'll try it next time. Seems like a better idea than my duck tape covered with silicone. Seals well, but it's hideous. I called jotto and their sending me 12 pads at no charge!! How awesome is that.


Thanks for the tip!
 

C2Installs

Member
May 24, 2010
477
Tennessee
code4services.com said:
...duck tape covered with silicone...

BTDT. Usually when a customer brings in a car that had its HAWs installed by some moron who butchered the headlights, I use the duct tape and silicone to cover the holes.


Yes, when vacuuming out the debris I remove all bulbs and their seals to cut down on the vortex action. Even so, the dust generated by those Sierra headlights was awful. Even going slow, it still made a mess.
 

ryan

Member
May 20, 2010
2,996
Massillon, Ohio
personally, I use a 1.5 hole saw, drill thru the outer housing, use the drill bit to create my inner housing start point, drill my 1 hole with a 1" step bit then used the 1.5" plastic to put it back over the hole and silicone it on.
 

C2Installs

Member
May 24, 2010
477
Tennessee
One more tip...when trying to remove a stray/stuck plastic chip (drilling debris) from a headlight, I have good luck using a 11-14" zip tie. It flexes and fits in tight spots, but is still rigid enough to maneuver. Chips seem to be attracted to the plastic zip-tie due to static, so often you can just touch the zip to the chip and pull it out. Otherwise, I just use the zip to knock the chip loose for the vacuum. Trust me, it works.


Also, a soft cleaning patch from a gun cleaning kit is good for making a big Q-tip for cleaning out dust in the headlights. OTIS makes round ones that are very soft and come in two sizes, they are the best IMO. Just wrap it around the head of a bigger zip-tie (like flex-cuff size) and use a small 4" zip-tie around it and the big zip-tie to hold it in place. Keep it kinda loose and fluffy. It will fit through the headlight and HAW holes and used to LIGHTLY wipe and swab as needed. DO NOT scrub hard or you will scratch the inside of the lenses.
 

cajunblitz

Member
May 20, 2010
1,217
Saint Martin Parish LA
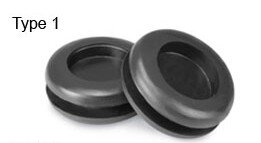
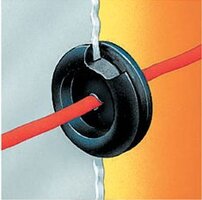
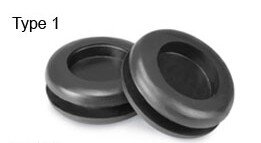
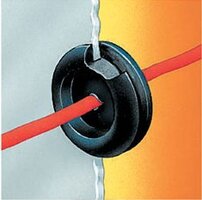
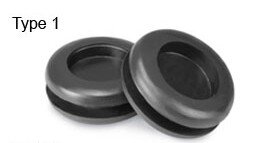
I do something similar, but use blank rubber specialty grommets to seal the larger hole, then silicone seal the cavity of the grommet where I poke the hole for my leads come through. The grommets come in various diameters and various panel thickness grooves. I stock one diameter in 2 thicknesses. Makes head replacement easy, just pop the grommet out.


Here's an example of the grommet and how it's used:


afarm6.static.flickr.com_5137_5470380924_7ab18e53a7_o.jpg


afarm6.static.flickr.com_5219_5470380912_20f18527dc_o.jpg


Next time I use them, I'll try to remember to shoot some photos for reference.
 

HFD eng1ine

Member
Jul 27, 2010
974
Essex County. MA
cajunblitz said:
I do something similar, but use blank rubber specialty grommets to seal the larger hole, then silicone seal the cavity of the grommet where I poke the hole for my leads come through. The grommets come in various diameters and various panel thickness grooves. I stock one diameter in 2 thicknesses. Makes head replacement easy, just pop the grommet out.

Here's an example of the grommet and how it's used:


afarm6.static.flickr.com_5137_5470380924_7ab18e53a7_o.jpg


afarm6.static.flickr.com_5219_5470380912_20f18527dc_o.jpg


Next time I use them, I'll try to remember to shoot some photos for reference.

This seems like a good solution, good idea Cajun...


KP
 

C2Installs

Member
May 24, 2010
477
Tennessee
cajunblitz said:

Cajun, can you shoot me a PM with your source? I've been trying to find something like that but all my grommet sources offer only ones with holes already in them. The method above was using what I had on hand.
 
May 25, 2010
7,072
Tunkhannock, PA, USA
code4services.com said:
I called jotto and their sending me 12 pads at no charge!! How awesome is that.

That's sweet!!! LoL

C2Installs said:
Cajun, can you shoot me a PM with your source? I've been trying to find something like that but all my grommet sources offer only ones with holes already in them. The method above was using what I had on hand.

I also would like to know your source...
 

Station 3

Member
May 21, 2010
3,395
Edinburg Texas
I just silicone the shit out of it. I have also placed a a layer of Gorrila Glue Duct Tape on the hole itself then silicone it with clear silicone and even it out. let it dry then apply a second layer of silicone if desired.


Cheap way to do it but those ideas are sweet also.
 

cajunblitz

Member
May 20, 2010
1,217
Saint Martin Parish LA
Station 3 said:
I just silicone the shit out of it. I have also placed a a layer of Gorrila Glue Duct Tape on the hole itself then silicone it with clear silicone and even it out. let it dry then apply a second layer of silicone if desired.


Cheap way to do it but those ideas are sweet also.

That used to be the only way back in the day, but it became a major PIA when you needed to change a head out. I hated doing that, so I searched many many sources until I found those specialty grommets. Much nicer to deal with if there's a problem.
 

SnuffJ25

Member
May 25, 2010
284
Penacook, NH
cajunblitz said:
That used to be the only way back in the day, but it became a major PIA when you needed to change a head out. I hated doing that, so I searched many many sources until I found those specialty grommets. Much nicer to deal with if there's a problem.

CajonBlitz- Where did you find those grommets?


joe
 

factorone33

Member
Jun 13, 2010
492
Merriam, KS
These ideas all work well. One thing we did here at the shop on a 2011 Impala for an LE agency in Kansas, was to cut a square access hole in the outer shell with a Dremel cutting disc, and then use the step bit for the actual HAW/LAW hole. The square piece is easier to replace in the existing access hole, and you can drill your wire lead holes a lot easier with the existing housing. A little silicone on the edges, and it's ready to go.
 

Forum Statistics

Threads
54,083
Messages
450,240
Members
19,150
Latest member
ArizonaFireTruckParty

About Us

  • Since 1997, eLightbars has been the premier venue for all things emergency warning equipment. Discussions, classified listings, pictures, videos, chat, & more! Our staff members strive to keep the forums organized and clutter-free. All of our offerings are free-of-charge with all costs offset by banner advertising. Premium offerings are available to improve your experience.

User Menu

Secure Browsing & Transactions

eLightbars.org uses SSL to secure all traffic between our server and your browsing device. All browsing and transactions within are secured by an SSL Certificate with high-strength encryption.