I had this idea a while ago, but only recently did it comr to fruition... I got the idea from the "Plug N Play" HLFs made for CVPIs, and I though, why not for other vehicles...? Also I didn't want to cut the hedlight wired in my fiancees new (to us) car...So here's what I did...
*** Note: This is for a Whelen UHF-2150A HLF (running a positive switched system), where it has a 2 wires for each headlight. But this can be modified for use with a "simple" HLF ***
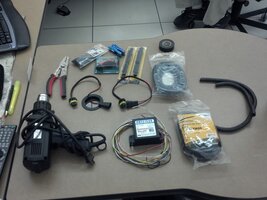
This is what I started with...

Here's the list of parts & tools:
- Heat Gun
- Wire Strippers
- Whelen UHF-2150A HLF
- 2 of these Headlight Bulb Extension Harnesses: eBay - New & used electronics, cars, apparel, collectibles, sporting goods & more at low prices (9005 are my high beam bulb, but they have them for just about every bulb socket.)
- In-line fuse holder
- heat shrink butt connectors
- Heat shrink "O" Terminals
- Heat shrink tubing
- Wire loom
- Zip-ties
- Electrical tape
Instructions:
1. Take the headlight extension wire harnesses and cut the positive wires in the middle between the 2 sockets
2. Take the HLF and separate the wires for the headlights (Blue, Blue/White, Yellow & Yellow/White)
3. Take the BLUE wire and connect it (with a heat shrink butt connector) to the positive side of the headlight extension harness that leads TO THE HEADLIGHT BULB
4. Take the BLUE/WHITE & WHITE wires and connect it (with a heat shrink butt connector) to the positive side of the headlight extension harsess that leads TO THE THE FACTORY HEADLIGHT HARNESS
5. Take the YELLOW wire and extend it (with the proper size & color wire & a heat shring connector) to the length you need to reach the passengers side headlight (with enough slack to make it look nice) and connect it (with a heat shrink butt connector) to the positive side of the other headlight extension harness that leads TO THE HEADLIGHT BULB
6. Take the YELLOW/WHITE wire and extend it (with the proper size & color wire & a heat shring connector) to the length you need to reach the passengers side headlight (with enough slack to make it look nice) and connect it (with a heat shrink butt connector) to the positive side of the other headlight extension harness that leads TO THE FACTORY HARNESS
7. Heat all the heat shrink connections then wire loom and zip-tie the wires so that is look nice. (use electrical tape or heat shrink tubing to seal the points where the extension harnesses come out of the loom)
8. Take the RED wire and connect it (with a heat shrink connector) to the in-line fuse (with no fuse installed), then extend (if needed) to your power source (I use the battery itself) and connect it (with the appropriate heat shrink connector)
9. Take the BLACK wire and connect it (with the appropriate heat shrink connector, extend if needed.) to a ground (I use the battery itself)
10. Take the ORANGE & WHITE/BLACK wires connect them (with a heat shrink connector) and extend it (using the correct size wire and heat shrink connector) to your switch source.
11. Heat the rest of the heat shrink connections then wire loom and zip-tie the rest of the wires so it looks nice. (use electrical tape or heat shrink tubing to seal the points where the power, ground, and activation wires come out of the loom)
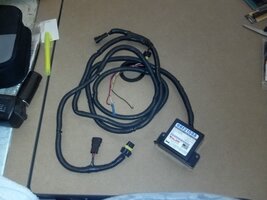
When you're done, It should look somewhat like this...

Then simply plug this in between the factory headlight harness and headlight bulb and you're done...
As I stated earlier, this is specific for a Whelen ULH-2150A and a positive switched headlight system, but can be modified for other HLFs and systems...
*** Note: This is for a Whelen UHF-2150A HLF (running a positive switched system), where it has a 2 wires for each headlight. But this can be modified for use with a "simple" HLF ***
This is what I started with...

Here's the list of parts & tools:
- Heat Gun
- Wire Strippers
- Whelen UHF-2150A HLF
- 2 of these Headlight Bulb Extension Harnesses: eBay - New & used electronics, cars, apparel, collectibles, sporting goods & more at low prices (9005 are my high beam bulb, but they have them for just about every bulb socket.)
- In-line fuse holder
- heat shrink butt connectors
- Heat shrink "O" Terminals
- Heat shrink tubing
- Wire loom
- Zip-ties
- Electrical tape
Instructions:
1. Take the headlight extension wire harnesses and cut the positive wires in the middle between the 2 sockets
2. Take the HLF and separate the wires for the headlights (Blue, Blue/White, Yellow & Yellow/White)
3. Take the BLUE wire and connect it (with a heat shrink butt connector) to the positive side of the headlight extension harness that leads TO THE HEADLIGHT BULB
4. Take the BLUE/WHITE & WHITE wires and connect it (with a heat shrink butt connector) to the positive side of the headlight extension harsess that leads TO THE THE FACTORY HEADLIGHT HARNESS
5. Take the YELLOW wire and extend it (with the proper size & color wire & a heat shring connector) to the length you need to reach the passengers side headlight (with enough slack to make it look nice) and connect it (with a heat shrink butt connector) to the positive side of the other headlight extension harness that leads TO THE HEADLIGHT BULB
6. Take the YELLOW/WHITE wire and extend it (with the proper size & color wire & a heat shring connector) to the length you need to reach the passengers side headlight (with enough slack to make it look nice) and connect it (with a heat shrink butt connector) to the positive side of the other headlight extension harness that leads TO THE FACTORY HARNESS
7. Heat all the heat shrink connections then wire loom and zip-tie the wires so that is look nice. (use electrical tape or heat shrink tubing to seal the points where the extension harnesses come out of the loom)
8. Take the RED wire and connect it (with a heat shrink connector) to the in-line fuse (with no fuse installed), then extend (if needed) to your power source (I use the battery itself) and connect it (with the appropriate heat shrink connector)
9. Take the BLACK wire and connect it (with the appropriate heat shrink connector, extend if needed.) to a ground (I use the battery itself)
10. Take the ORANGE & WHITE/BLACK wires connect them (with a heat shrink connector) and extend it (using the correct size wire and heat shrink connector) to your switch source.
11. Heat the rest of the heat shrink connections then wire loom and zip-tie the rest of the wires so it looks nice. (use electrical tape or heat shrink tubing to seal the points where the power, ground, and activation wires come out of the loom)
When you're done, It should look somewhat like this...

Then simply plug this in between the factory headlight harness and headlight bulb and you're done...
As I stated earlier, this is specific for a Whelen ULH-2150A and a positive switched headlight system, but can be modified for other HLFs and systems...
