2010 FORD CVPI INSTALL ASSISTANCE

COMMTECH

Member
Jun 30, 2010
26
NEW JERSEY, USA
6-30-10 2125 HOURS EDT


Hello all......just received a new unmarked 2010 Ford CVPI to upfit and am looking for some install assistance. Any Ford guys out there>>>


1. the horn/siren wiring prep pkg. RPO #175- in the past Ford has always left a nice long run


of about 4 feet of LG/OG wire marked and left wire tie wrapped under the steering column.


cannot seem to locate same on the 2010....any ideas where they hid it this year??? :?:


2. this year they ordered the RPO #476" lamp pre wire group" for the under decklid (trunk lights) and the package shelf lights. Even with the Ford upfitters guide and Helm Elec. Diag.Manual, I cannot decipher this setup. All the wires for both sets of lights as well as the trunk release solenoid go to a relay block at center of inside of the trunk lid, which consists of 3 relays and a flasher. Does this flasher have an internal mercury switch for the automatic flashing of the inside trunk lid lights when decklid is in raised position? If you opt to use the package shelf light wiring (which terminates as single wires with bullet connectors left hanging in the trunk) where is the +12vdc wire lead to activate these lights-up in the harness/on the trans. hump or wiring harness, or are these for additional stop/brake/turn lamps on the rear package shelf?? Have Federal Sig. halogen alternating lights pulled from the


prior care ( 2003) to use for these, and a pair of Whelen dual Avengers for the rear package shelf and I'm really considering just running my own wiring for these if I can't figure out what Ford had in mind when they wired this option LOL.


Any help with these items will be gratefully appreciated.


Thanks to all in advance :)
 

InstallDude

Member
May 24, 2010
66
United States/Texas
Not sure on lighting wires,but the horn ring wire,I can help with.The easiest way to access is-1)remove dash trim piece,it runs from the steering column,around the A.C.controls,to the end of dash on passeger side.2)Unplug the trunk button,to let trim hang lower,leaving it hang by the airbag light wires.3)Remove the 4 screws,holding the A.C.contol plate in place.Pull out as much as possible,and to the right.The wire is bundled,and taped to a loomed wire bundle,back,and to the left.I have gotten so used to doing this,I just reach back there,grab the bundle,pull on it,until i can release the wire.Any way,you should be able to see it with a light,It is dark blue,with a black plug on it.Good Luck
 

COMMTECH

Member
Jun 30, 2010
26
NEW JERSEY, USA
Thanks for your reply, InstallDude!


I have a hard time believing that Ford actually put that wire in a place which will take any installer at least a half hour to dig out! PS-Just looked again in the Helm Elec Diag manual and on p.44-1 noticed a little box listed a


"Police" with a connector number listed as C263, which upon further inspection is under the right


side kick panel above the lightbar connector. I will have to investigate this personally tomorrow


but at least is lists the wire color there as DARK BLUE. In past years CVPI's the "loop" was always


under the steering wheel and was yellow with light green stripe. What year did they change this to blue and the location behind the kick plate??
 

InstallDude

Member
May 24, 2010
66
United States/Texas
You are welcome.I believe it has been that way on ours,for 2 years now,and the wire has always been dark blue.They used to have it right below the glove box,then it moved to above the gas pedal,finally ending up,where it is now.Our cars come with the base package only.I remember cutting the green/orange wire,uhder the steering wheel,back in `96,when I started.
 

EL1998P71

Member
May 23, 2010
704
Sterling Heights Mich
Horn ring for the last 3 years has been behind the glove box towards left side of the glove box door(and has been dark blue).


I've had a few cars where the Horn ring "loop" has been behind the heating/cooling controls.


If you get it at column, it may not work right.


If you hook up lights to the harness on the trunk lid it will flash when the lid is up.


It turns off when the latch is closed. But it's still made for halogen/incandescent lamps. Not LED's


the upfitters guide tells you one thing, and the factory does it differently.
 

COMMTECH

Member
Jun 30, 2010
26
NEW JERSEY, USA
July 6,2010 2231 edt


HELLO ALL.....


Thanks ELI1998P71- Have been going nuts trying to locate that loop of blue wire with C263 inline connector which is supposed to have been behind the passenger side kick plate....right! LOL


Install Dude was kind enough to tell me that he has located this loop behind the dashboard, and I was cringing thinking about removing that entire dash trim piece as well as the AC panel etc.


Was glad to read l your post just now....seems a little more logical that they stuck it up behind the glove box, which I have to remove anyway so as to mount a scanner and speaker .


I will check tomorrow morning and hopefully see that wire back there. Why doesn't Ford Fleet


just keep everything simple like they used to and leave that coil of wire tied to the bottom of the steering wheel harness....


As far as the trunk lid lights, I suspected that the inside deck lid lamps worked off the flasher to the right of the array of 3 relays in the center of the inner deck lid. I presume that the flasher somewhere has a mercury switch built into same so as the shut down the lights as you close the lid or does it rely on the actual latching mechanism to shut them off??? I always place a switch of my own when I have wired these myself so my next question is which wire should I cut and where to put a switch inline so as the keep these lamps from coming on automatically since this car is an unmarked and they don't want these lights from coming on by themselves in many cases. I usually place this switch on the driver side trunk lid support close to the hinge.


As far as the package tray light wiring prep, is this actually to put two "lollipop" lights on the


package shelf which operate as additional stop, turn and brake lamps?? They ordered this thinking it would be prepped for easy installation of a pair of Whelen Dual Avenger units


which are going up there secured with Velcro hook tape.


Thanks again for your kind assistance!!
 

COMMTECH

Member
Jun 30, 2010
26
NEW JERSEY, USA
JULY 7 2010 1920 HOURS EDT


Hello all.............


Spent the better part of today trying to remove the ash tray and it's frame from the dashboard


in order to find and connect that infamous dark blue "HORN SIREN WIRE" to no avail. Got the


ash tray out (push down on the the spring clip stop on each side.) However, cannot seem to remove the ash tray frame in order to be able to see up above it and spot this dark blue wire


loop that everyone states is taped to the loom up there. I see two hex head screws closest to the firewall side heads facing down toward the transmission tunnel . Are these what's holding the


ash tray frame in there??? What's the easiest way to get this out and access that dark blue wire........there has to be an easier way to get to it :roll:


Any suggestions and assistance will be greatly appreciated!!!


Thanks in advance....you guys are great !
 

cajunblitz

Member
May 20, 2010
1,217
Saint Martin Parish LA
COMMTECH said:
I see two hex head screws closest to the firewall side heads facing down toward the transmission tunnel . Are these what's holding the
ash tray frame in there??? What's the easiest way to get this out and access that dark blue wire........there has to be an easier way to get to it :roll:


Any suggestions and assistance will be greatly appreciated!!!


Thanks in advance....you guys are great !

I'm getting a headache reading all the information on how to access that horn ring wire. The two hex screws you see are in fact what is holding the ashtray frame in.....and they are a PIA to remove easily, but if you get them out, the tray will fall down and back and can be removed. You will see the loop connector taped up on the diagnostic port harness, looking in towards the steering column. If you have small enough hands, the easiest way is to just reach up in there and grab the connector and manipulate the jumper out without removing the ashtray frame. It's taped to the data port harness, but high up enough that it's a little tricky to get loose. It's not easy, but once you get the hang of it, you get used to doing it.


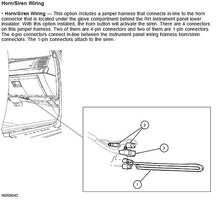
From 1997 to 2006 models, the jumper was located below the glove box, as seen here:


afarm5.static.flickr.com_4120_4772492269_eb81572827.jpg


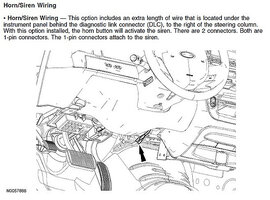
In 2007, they moved the jumper to under the drivers side above the diagnostic port, as seen here:


The drawing is incorrect in that it is showing a pair of bullet connectors on the loop, when in fact, the loop has the same connector shown in the first drawing. The location of the loop is correct however.


afarm5.static.flickr.com_4140_4773131220_4efbc8b670.jpg


I can't speak anyone else, but I haven't seen that jumper in the glove box area since 2007, and have been accessing the jumper as shown in the second drawing since then right up to now. And I've built a lot of Crown Vics since 2007.


It's a PIA to pull down without disassembling things, but I've gotten used to just maneuvering my hand up and in there and feeling for it. Once I get a hold if it, I just find an open part of the loop that isn't taped and pull it down. Works every time.
 

COMMTECH

Member
Jun 30, 2010
26
NEW JERSEY, USA
7-7-10 2147 hours edt


Hey there.........


Thanks Cajunblitz! Finally some pictures. Just to clarify, since I have small hands I should be able to reach up and grab this loop without removing that darn ashtray frame? Thank goodness-


those two hex head screws are almost impossible to access even with my tiny 1/4 socket set!


The Helm Electrical Diagnosis manual depicts a single pin connector, C263 with a loop of dark blue wire. Is the connector black or gray?? I don't know why Ford has to constantly do things like this when they know darn well we have to locate and use this wire-why not leave it under the dash like they used to do???????


Once again, thank you. I will check it out tomorrow afternoon and let you know if I am successful in locating it!


COMMTECH :)
 

cajunblitz

Member
May 20, 2010
1,217
Saint Martin Parish LA
COMMTECH said:
7-7-10 2147 hours edt
Hey there.........


Thanks Cajunblitz! Finally some pictures. Just to clarify, since I have small hands I should be able to reach up and grab this loop without removing that darn ashtray frame? Thank goodness-


those two hex head screws are almost impossible to access even with my tiny 1/4 socket set!


The Helm Electrical Diagnosis manual depicts a single pin connector, C263 with a loop of dark blue wire. Is the connector black or gray?? I don't know why Ford has to constantly do things like this when they know darn well we have to locate and use this wire-why not leave it under the dash like they used to do???????


Once again, thank you. I will check it out tomorrow afternoon and let you know if I am successful in locating it!


COMMTECH :)

COM, the connector is black and the wire is indeed a dark blue. You will notice that the wire on one side of the connector is a smaller gauge than the other; this is the "ring" side that comes from the horn contact in the steering wheel. The other wire is slightly larger and is the "horn" side that goes to the relay for the horn. Tie them in accordingly.
 

Dragon

Member
May 27, 2010
52
Mississippi
Is the horn/siren wiring standard on all CVPI s or is it an option that had to be ordered?


Our department uses PA300s which has the horn ring tap feature capability but the department does not have it hooked up during the installation contract. Last car I had I think was about a 2003 and I did it myself with a little research and located the wire in the column and it worked great. But I wish I could have found a horn/siren wire that was left for that purpose.


I will be getting a CVPI in the next few weeks but not sure what year model, so glad I found this post. I will be hooking up my siren to the horn again.


My only complaint on the PA300 is that it comes standard with the high wail as the sound you get on horn tap and I wanted the air horn. The instructions make it seem really easy by changing some jumpers inside. But those jumpers were soldered on and not the pull off kind like you find on a hard drive, etc. So that was a pain.
 

EL1998P71

Member
May 23, 2010
704
Sterling Heights Mich
You really didn't need to drop out the ashtray.


You should've just pulled the trim off around the climate controls( the piece with the trunk release in it)


and take the four 7m screws out and pull the climate controller out. and if the connector is not accessible from under the glove box, then it will be there. I have about 20 of those extension horn ring harness's (I used to have 200 of them)


The horn ring connector is standard, the extension harness that plugs into it is an option.


They changed alot of things for really no reason. when upfitting, it's a pain and time consuming.
 

COMMTECH

Member
Jun 30, 2010
26
NEW JERSEY, USA
7-8-10 2118 HOURS EDT


Hello Cajunblitz..........


Thanks again for the additional information. I just went out and reached up along the


diagnostic connector harness and felt what seems like the loop !!! It felt as though it was two


wires folded back and forth which are wrapped in that smooth black plastic "tape"( like they use to wrap the grille light/siren speaker wiring that you order which lays on the floor of the passenger side and goes through the firewall and the ends are by the blower motor under the hood) - is this what I have been searching for?? I presume the wires are indeed "wrapped" and not just a loop of dark blue wire ?


I did not get to remove the ash tray frame, only pulled out the tray itself . Tomorrow when it is cooler out I will take an x-acto knife on a stick and reach up there and cut the tape holding this bundle to the harness so it can drop down into my hand.
 

COMMTECH

Member
Jun 30, 2010
26
NEW JERSEY, USA
P.S.---Cajunblitz---I presume that the connector is actually two parts connected together and when we are going to utilize them, we simply disconnect the two pieces (i.e.- essentially when we separate it we are figuratively "cutting the loop" as we used to do on earlier models?


We are using the MOTOROLA Systems 90S siren and when connecting the two ends of the loop


we do so to a Bosch relay. The side of the blue wire that goes to the vehicle horn ring connects to relay pin 30 and the side that goes to the vehicle horn relay goes to relay pin 87A . When the siren controller is set for MANUAL and the horn ring is pressed, you get no horn but siren tone WAIL. If you set the siren controller to WAIL, and the horn ring is depressed, the siren goes to


YELP . At no time when the siren is on will you get horn sound along with siren tone.


Also, the Helm Electrical Diagnostic manual shows the blue wire bundle having inline connector


C263 as only one loop of wire with single terminal mating halves. Are they right about this at least????
 

cajunblitz

Member
May 20, 2010
1,217
Saint Martin Parish LA
COMMTECH said:
P.S.---Cajunblitz---I presume that the connector is actually two parts connected together and when we are going to utilize them, we simply disconnect the two pieces (i.e.- essentially when we separate it we are figuratively "cutting the loop" as we used to do on earlier models?
We are using the MOTOROLA Systems 90S siren and when connecting the two ends of the loop


we do so to a Bosch relay. The side of the blue wire that goes to the vehicle horn ring connects to relay pin 30 and the side that goes to the vehicle horn relay goes to relay pin 87A . When the siren controller is set for MANUAL and the horn ring is pressed, you get no horn but siren tone WAIL. If you set the siren controller to WAIL, and the horn ring is depressed, the siren goes to


YELP . At no time when the siren is on will you get horn sound along with siren tone.


Also, the Helm Electrical Diagnostic manual shows the blue wire bundle having inline connector


C263 as only one loop of wire with single terminal mating halves. Are they right about this at least????

Your presumption is correct. Look at the photo above that EL1998P71 has provided. The top connector that has been cut from the loop is what you are feeling for and want to pull down from the diagnostic harness. I don't like the x-acto knife idea.....you may wind up cutting something you shouldn't.....like yourself. Just pull on it hard enough and it'll come down.


The Helm description is right. One loop, single terminal mating halves. Unplug them, cut them off, and ties your horn ring wires into those accordingly. Remember, the smaller wire is "ring", the larger is "horn".
 

COMMTECH

Member
Jun 30, 2010
26
NEW JERSEY, USA
7-9-10 2107 HOURS EDT


Hey there Cajunblitz and Eli.....


Success!!! Got to work on the car this evening and pulled down the loop with my hand, only casualty was a small lac. to the tip of my middle finger LOL, must have been a sharp corner on one of the darn support brackets up there- anyone else doing this I suggest wearing a thin pair of gardeners gloves.


Many thanks again as I would never known what harness to look on for this loop. Tested the loop after separating the connectors and found the ring part (20-22 ga wire) goes to ground and the horn relay side tested hot with my computer safe probe ( 16 to 18 ga wire). In the past when using a non-computer safe test probe, used to touch the horn relay side to ground of the vehicle body and the horn would sound, not so with the computer safe probe connected to ground-I suspect due to the fact that it is a computer safe test probe.


Only other question is ref. the siren speaker/grille light wiring which goes through the firewall and ends on the passenger floor mat . Out in the engine compartment, one of the five wires comes off the loom and is connected to a small black box, probably a flasher unit which is connected to two leads which terminate at the wiring loom support in front of the radiator. I really was hoping to use these for my Whelen led grille lights but want to know if there is a way to remove that flasher and "jumper" the two leads and connect them to the wire which comes from the floor inside the car with the other 4 wires so I can supply the already run leads to the grille lights with +12 volts.
 

EL1998P71

Member
May 23, 2010
704
Sterling Heights Mich
The black box is a halogen flasher for the wires in front of the radiator, taped to the wiring crossrail.


You can bypass it, but it's buried behind the fender plastic. Screws in the wheel well will help you access it better.


We used to have to pull it out to have an extra wire for the MSP hood sign. I still am puzzled why ford buried it insted of having it on top of the fender splash guard near the distribution box.
 

COMMTECH

Member
Jun 30, 2010
26
NEW JERSEY, USA
7-uj11-10 2300 HOURS EDT


Hi there El1998P71......


Thanks for the info. The black box is about the size of a pack of cigarettes and electrical taped to the harness which is under the fender brace to the outside of the hood piston on passenger side. If I can get the tape cut I can swing it out so as to be able to grab it and untape it from its base. Then I figured I could jump the gray/ blu wire from the inside of the car that goes to the flasher which i n turn goes to the two wires on crosspiece in front o f the radiator. Before I do so, what type of contacts are on the flasher base, i.e. what would I need to make a jumper so as to connect the two grille light wires to the wire which goes through the firewall with the other four into the passenger compartment?


Also, they ordered the "lamp pre-wire group" which includes the inside the trunk lid wiring for flashing lights attached to the inside of the lid as well as well as the package tray wiring which is found in the trunk running from left to right clipped to the bottom edge of the package tray in the trunk and is only a bullet connector on each side. This also goes to that array of three relays and one flasher on the inside of the trunk lid. I was going to use these for the +12 volt side of the Dual Avengers they want on the package shelf but even with the Helm Manual I still cannot figure out where the other end of this wiring is supposed to be and how you are supposed to connect to it. Is this actually supposed to be for two loppipop lights up there which act as additional brake, tail and directional lamps???


Thanks also for the photos of the horn ring connectors and harness pic. Where do you purchase that horn siren wiring harness which apparently mates with the in car connector halves??? Do you have a Ford part number for this part???


Many thanks again !
 

EL1998P71

Member
May 23, 2010
704
Sterling Heights Mich
If the flasher is the size of a pack of cigarettes, then they changed the flasher. The flasher I know of was the three prong, that's approx 1"x1"x2" in size.


The bullet connectors under the package tray are for BRAKE/TURN signals only (like for lollipop lights)


And PM sent about the horn ring harness.
 

COMMTECH

Member
Jun 30, 2010
26
NEW JERSEY, USA
7-13-10 10 PM EDT


Hi EL1998P71....


Thanks again for the info. Also received your PM for which I thank you. However I had already


labeled and cut the connector off the loop and and butt spliced it into my Bosch relay circuit.


Thanks also for the front flasher info. They obviously changed the flasher from the usual silver can flasher that we are all used to seeing but this guy is about 2x2x1" black plastic housing electrical taped to the harness in then"front right footwell" in the engine compartment.


Regarding the package tray and inside trunk lamp wiring that we got, I will now have to


run my own wiring for the two Whelen Dual Avenger lights for the package shelf. Regarding the inside trunk lid wiring, I know from what either yourself or Cajunblitz stated that these are for two alternating halogen flashing lights which I will be using which apparently go on as soon as the trunk lid latch opens and which shut down when the lid latch closes. I see the wiring for these lights goes to that block of three relays and one flasher mounted to the inside of the trunk lid. I have been asked to install a switch so that these inside trunk lid lights do not automatically go on when the lid is raised. What color is the wire that I should cut and can I make the splice down on the driver's side at the inside of the trunk where the connector is on the harness there which mates with the harness from the inside of the trunk lid.


Thanks again!
 

Mike M.

New Member
May 25, 2010
13
TX
Sorry to dredge up an old thread...


Are all CVPIs pre-wired with the headlight flashers now? On my '05, we just removed the plug near the radiator and cut the loop, spliced in the HLF, and were good to go. On my new one, Ford changed the plug and it's just capped off.


My marked '04 had a flasher up on the passenger fender (or maybe it was my '01...can't remember).
 

cajunblitz

Member
May 20, 2010
1,217
Saint Martin Parish LA
\ said:
Sorry to dredge up an old thread...

Are all CVPIs pre-wired with the headlight flashers now? On my '05, we just removed the plug near the radiator and cut the loop, spliced in the HLF, and were good to go. On my new one, Ford changed the plug and it's just capped off.


My marked '04 had a flasher up on the passenger fender (or maybe it was my '01...can't remember).[/quote


That capped off plug on newer Police Package CVPIs is for a Plug-N-Play flasher. Some Plug-N-Play flashers designed for the newer Vics that plug into that capped connector have a DRL cutoff feature, which is utilized with one of the 3 wires in the PNP capped plug. This feature disables the DRLs while the flasher is active. It is not recommended to cut and splice a flasher into the newer Vic headlight wiring. You can order a CVPI with an included flasher, but most agencies don't and add their own Plug-N-Play version.
 

Mike M.

New Member
May 25, 2010
13
TX
Basically, the old plug was plug & play as well. What do I need to buy in order to not cut the plug, but to add the HLF I used on the '05. I've been without it for awhile, so it's no big deal, but I'd like to add them again. Is there an adaptor out there?
 

southwestauto

New Member
Dec 21, 2011
1
USA New Mexico
The dark blue wire is still being used on the 2011 Ford CVPI. Its a pain to get to the wire and connector because they are taped to another wire bundle. We had to remove air conditioning control and strip of plastic with the trunk release button. Cut tape and about 2 feet of dark blue wire becomes available. Small gauge wire is ring and larger gauge is horn.
 

EMT-BLS

New Member
Oct 28, 2011
2,640
Waterbury, CT
southwestauto said:
The dark blue wire is still being used on the 2011 Ford CVPI. Its a pain to get to the wire and connector because they are taped to another wire bundle. We had to remove air conditioning control and strip of plastic with the trunk release button. Cut tape and about 2 feet of dark blue wire becomes available. Small gauge wire is ring and larger gauge is horn.
WOAH. Massive resurrection!
 

Forum Statistics

Threads
53,964
Messages
449,809
Members
19,103
Latest member
Safetylight5

About Us

  • Since 1997, eLightbars has been the premier venue for all things emergency warning equipment. Discussions, classified listings, pictures, videos, chat, & more! Our staff members strive to keep the forums organized and clutter-free. All of our offerings are free-of-charge with all costs offset by banner advertising. Premium offerings are available to improve your experience.

User Menu

Secure Browsing & Transactions

eLightbars.org uses SSL to secure all traffic between our server and your browsing device. All browsing and transactions within are secured by an SSL Certificate with high-strength encryption.