Default file for WeCan gen 2

EastTxMedic

New Member
Jan 24, 2021
6
Tyler, TX
Good morning, I ran across this site and it seems like the place to ask this question. I did a few searches and don't see exactly what I'm looking for, or maybe I did and just didn't realize it.

I have an older (2014ish) Liberty SOLO. I had to get a WeCan contoller off ebay to operate it from my switch box. Well, out of the box (It was sold as New old stock) it worked ok, but I wanted to tweak it. The low power mode dimmed all the different patterns, and it had a cruise that was fairly dim. Now on to my mistake.....

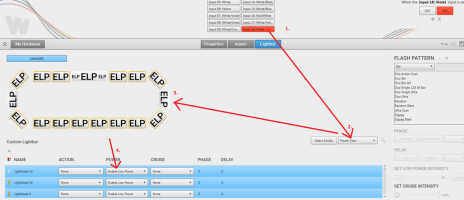
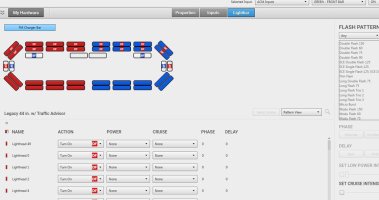
I created a profile and transferred it over to the WeCan module without extracting and saving the default. I've figured out most of how to create my patterns and such, but now I don't know how to activate a low power mode. Since I built a profile from scratch, the violet wire has no assignment anymore. All my patterns, including the cruise, are full bore super bright. The default, when I first installed it, dimmed everything when I put power to the violet wire.

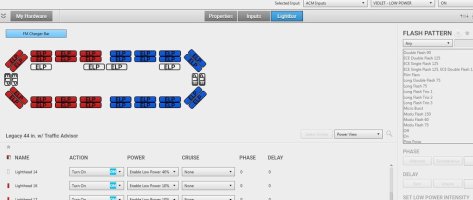
I'd appreciate if someone could point me towards some instruction on how to activate/set the low power mode. I have an available +12v switch but I don't know what to set in the programming so that it dims the various patterns I have set in it when I put +12v to the violet wire. I assume it will dim the cruise as well, it's so bright right now it can be used as scene lighting.

Thanks All.
 

tsquale

Lifetime VIP Donor
Oct 12, 2010
10,537
Minnesota, USA
I'm using Whelen Command 2.0.1.0

I see how to set the "low power" and "cruise" percentages, but I don't know how to activate them.
If I am remembering correctly, you chose trigger / input 18 (purple wire) in the program and then select the head you want to be effected by the low power trigger. I'm at work but can look at the program later tonight to try and verify that
 

RS485

Supporting Donor
Aug 5, 2019
370
Central MA
I think its something like this:
1. Select "Input 18:Violet"
2. Select "Power View"
3. Select which light heads it should apply to
4: Select "Enable Low Power" in the drop-down (it should automatically apply to all selected heads)
See attached.
 

Attachments

  • setlowpower.png
    setlowpower.png
    157.3 KB · Views: 4
  • Like
Reactions: tsquale and Tony P

tsquale

Lifetime VIP Donor
Oct 12, 2010
10,537
Minnesota, USA
I think its something like this:
1. Select "Input 18:Violet"
2. Select "Power View"
3. Select which light heads it should apply to
4: Select "Enable Low Power" in the drop-down (it should automatically apply to all selected heads)
See attached.
I would concur. That was what I was seeing in my head and trying to describe
 

EastTxMedic

New Member
Jan 24, 2021
6
Tyler, TX
Ok guys, I appreciate it. So by doing that, do I also select "turn on" on the light bar properties for the Violet wire or no? And this will dim those selected heads regardless of whatever other input is on and flashing?

Or do I need to "enable low power" for those heads on each pattern that I want the low power to apply to?(ex: the green wire making the front of the bar flash)
 

Attachments

  • frontbar.JPG
    frontbar.JPG
    65.7 KB · Views: 2
  • violet.JPG
    violet.JPG
    58.2 KB · Views: 2

RS485

Supporting Donor
Aug 5, 2019
370
Central MA
I don't think you need to explicitly select "Turn on" for the violet wire. As I understand it, low-power is applied to the heads you've selected elsewhere (for other inputs and patterns).

That said, if you take a look at other inputs, you can "Disable Low Power" which I think means, "even if the low-power input is turned on, DO NOT apply to this head if its flashing under control of this wire".

Hope this makes sense.

(example - takedowns and alleys -- even if low-power is applied for the warning lights, one might still want scene lighting to be 100 %).
 
Last edited:

EastTxMedic

New Member
Jan 24, 2021
6
Tyler, TX
I don't think you need to explicitly select "Turn on" for the violet wire. As I understand it, low-power is applied to the heads you've selected elsewhere (for other inputs and patterns).

That said, if you take a look at other inputs, you can "Disable Low Power" which I think means, "even if the low-power input is turned on, DO NOT apply to this head if its flashing under control of this wire".

Hope this makes sense.

(example - takedowns and alleys -- even if low-power is applied for the warning lights, one might still want scene lighting to be 100 %).
I understand. I appreciate the input. When I get off in the morning I'll plug in and see what I can do.
 
  • Like
Reactions: RS485

Forum Statistics

Threads
54,118
Messages
450,340
Members
19,164
Latest member
Caldwell205

About Us

  • Since 1997, eLightbars has been the premier venue for all things emergency warning equipment. Discussions, classified listings, pictures, videos, chat, & more! Our staff members strive to keep the forums organized and clutter-free. All of our offerings are free-of-charge with all costs offset by banner advertising. Premium offerings are available to improve your experience.

User Menu

Secure Browsing & Transactions

eLightbars.org uses SSL to secure all traffic between our server and your browsing device. All browsing and transactions within are secured by an SSL Certificate with high-strength encryption.