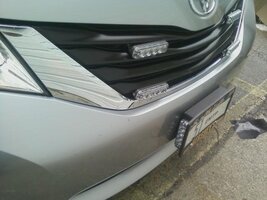
Rect 13's to be installed

medic102

Member
Jul 1, 2010
28
Brooklyn
Hey Im a first time poster here and was looking for some advice.


I have an 09 accord.


Currently installed:


ss2000 smart siren,100W speaker


Front: 2 Whacker Fury's @ top of windshield, Slimlighter (1st gen)on dash, wigwags, and a cherry that I throw on the roof when on a call.


Back: 2 Whacker Inciter EX - 2 Head on deck in rear windshield.


The problem here is that I dont have any side visibility. Now everything up till now was installed by someone whos job im not very happy with and I would like to do it myself from here on in. I have 4 Rect13's, 2W, 2R that I want to install. 2reds on a 10-75 bracket up front, and 2 whites, one on each side in the rear doors small window.


Now because Im doing this myself, I wanted to know if anyone has any tips or advice on how to go about this. I dont have money now to go to another installer, and besides I would like to try this myself. What tools and supplies would I need? what wire guage would I need and what would I have to do in order to run the wires. Do I need something to protect the wires as they run through the engine?


Does anyone have any manuals or illustrations showing how to remove the door panels and B column panels?


Thanx so much for taking the time to look at this post. If you have any ideas on where to put the Rect13's, Im open to them.
 

unlisted

Lifetime VIP Donor
May 20, 2010
7,333
NA
To be honest, if you need to ask for this much information, you should not be installing. Find someone local who does installs, and ask them if they would come over on a weekend for a case of beer, and pick their brain/assist them as they are installing.
 

VolEms

Member
May 24, 2010
2,112
NY, USA
If you are able to go to KJ I have an installer who would do it for $150-$200. He can do it while you wait. I think its worth it to leave it to the pros.ai950.photobucket.com_albums_ad345_VolEms_medic8grill.jpg
 

VolEms

Member
May 24, 2010
2,112
NY, USA
Depends on what agency you run with. In a agency where the responders go direct to the scene they have Red and a Siren . Line officers also run red it depends on the Captain of your Squad.
 

medic102

Member
Jul 1, 2010
28
Brooklyn
unlisted said:
To be honest, if you need to ask for this much information, you should not be installing. Find someone local who does installs, and ask them if they would come over on a weekend for a case of beer, and pick their brain/assist them as they are installing.
i dont know anyone local that would be willing to come over or let me hang around :( . Everyone starts off like this. Nobody is born with the knowledge, they learn it along the way. I want to learn and the only way is getting my hands dirty...besides, im a quick learner! :)
 

VolEms

Member
May 24, 2010
2,112
NY, USA
Guys help him out he just wants to know how to run the wires through the fire wall and what guage wire to use. Medic 102 if all else fails I can send you to a good installer for a good price. After all its a new Accord . I feel for you in NY most installers are a rip off.
 

unlisted

Lifetime VIP Donor
May 20, 2010
7,333
NA
14 gauge wire and you won't go wrong. Find the grommet that feeds wires through the firewall already and use that point to get the wires through. Make sure you FUSE as close to the battery, and if you are like me, before the switch as well.
 

medic102

Member
Jul 1, 2010
28
Brooklyn
unlisted said:
14 gauge wire and you won't go wrong. Find the grommet that feeds wires through the firewall already and use that point to get the wires through. Make sure you FUSE as close to the battery, and if you are like me, before the switch as well.
thanx! what about any heat insulation?
also, does anyone have any ideas about the lights that i want to run from the small windows in the rear doors?
 

unlisted

Lifetime VIP Donor
May 20, 2010
7,333
NA
Wire/split loom for insulation in the engine compartment. Make sure you use Automotive wire, and NOT Cat 5 (computer) household or speaker wire- they are simply not made or automotive (and/or) high heat use.


Regarding the rear door windows- this will require much more work, that may be a tad advanced for ya... (in theory) and possibly require more tools than you currently own. Dunno what you are driving, but if you want to make it look good do the following:


Remove the floor trim panels along the door sills, both front and back. Remove B pillar trim if at all possible. Remove rear door panels. Trust me, INVEST in a trim panel tool if needed.. they will save ya so many headaches.


See if any wires are already fed through to the door in some fashion, (like power window switch, etc) and if so, attempt to fish a line through there, or fish tape. Work your "automotive" wires through the same route (normally in a rubber boot, or protective spring, and protect if needed. (again, split loom works well) Feed the wires where you need them to go up to the front of the vehicle on both floor/door sills.


For the actual hole where the wires will connect to the light head, you will need to drill a small hole, and feed said wires through. Bonus marks for using a properly spaced grommet for the wire hole. put everything back together, making sure the wires are not pinched anywhere along the line. You can get away with 16 gauge wire for this part, and will probably be easier to work with. (heck, maybe even 18 gauge)


Tie in the new wires with whatever switch(es) you plan on using. If you are running a Smart Siren from the trunk, of course run the wires to the trunk, not to the front. Triple think everything out, write it down, make sure you have all necessary tools and supplies before you tackle any of this.


For your grille lights, seriously consider soldering/shrinkwrapping/weatherproofing all the connections- since you will be dealing with salt in the winter. Also still use split loom on as much as possible for anything exposed to any sort of element. Heck I even use split loom under the dash... :p


Also expect to spend a good 5-9 hours (possibly even longer) when you are doing it (overall) for the first time.. and take your time as well. This is not a 2 hour job if done properly.... IMO. Look over the car many times first, poke around, get a feel for where you "want" to pass the wires through, how, etc. Make a blueprint of sorts.. and than lay out all the wiring.. Reevaluate as needed, and than remove all the panels. Reevaluate all your plans/runs for a third time, fix any errors you have noticed- than- start the actual install. Also, cut your wires if at all possible after you have "run" the wire lines fully where they need to go, or cut it well longer than needed- that way you won't run into any "short" cables of sorts, and attempt to splice if needed.


Hope this helps, and we demand photos before, during and after :)
 

medic102

Member
Jul 1, 2010
28
Brooklyn
unlisted said:
Wire/split loom for insulation in the engine compartment. Make sure you use Automotive wire, and NOT Cat 5 (computer) household or speaker wire- they are simply not made or automotive (and/or) high heat use.

Regarding the rear door windows- this will require much more work, that may be a tad advanced for ya... (in theory) and possibly require more tools than you currently own. Dunno what you are driving, but if you want to make it look good do the following:


Remove the floor trim panels along the door sills, both front and back. Remove B pillar trim if at all possible. Remove rear door panels. Trust me, INVEST in a trim panel tool if needed.. they will save ya so many headaches.


See if any wires are already fed through to the door in some fashion, (like power window switch, etc) and if so, attempt to fish a line through there, or fish tape. Work your "automotive" wires through the same route (normally in a rubber boot, or protective spring, and protect if needed. (again, split loom works well) Feed the wires where you need them to go up to the front of the vehicle on both floor/door sills.


For the actual hole where the wires will connect to the light head, you will need to drill a small hole, and feed said wires through. Bonus marks for using a properly spaced grommet for the wire hole. put everything back together, making sure the wires are not pinched anywhere along the line. You can get away with 16 gauge wire for this part, and will probably be easier to work with. (heck, maybe even 18 gauge)


Tie in the new wires with whatever switch(es) you plan on using. If you are running a Smart Siren from the trunk, of course run the wires to the trunk, not to the front. Triple think everything out, write it down, make sure you have all necessary tools and supplies before you tackle any of this.


For your grille lights, seriously consider soldering/shrinkwrapping/weatherproofing all the connections- since you will be dealing with salt in the winter. Also still use split loom on as much as possible for anything exposed to any sort of element. Heck I even use split loom under the dash... :p


Also expect to spend a good 5-9 hours (possibly even longer) when you are doing it (overall) for the first time.. and take your time as well. This is not a 2 hour job if done properly.... IMO. Look over the car many times first, poke around, get a feel for where you "want" to pass the wires through, how, etc. Make a blueprint of sorts.. and than lay out all the wiring.. Reevaluate as needed, and than remove all the panels. Reevaluate all your plans/runs for a third time, fix any errors you have noticed- than- start the actual install. Also, cut your wires if at all possible after you have "run" the wire lines fully where they need to go, or cut it well longer than needed- that way you won't run into any "short" cables of sorts, and attempt to splice if needed.


Hope this helps, and we demand photos before, during and after :)
HOLY MOTHER! thanx so much! im definitely gonna be taking pics throughout the process and will advise
 

Forum Statistics

Threads
54,179
Messages
450,540
Members
19,188
Latest member
htamboli

About Us

  • Since 1997, eLightbars has been the premier venue for all things emergency warning equipment. Discussions, classified listings, pictures, videos, chat, & more! Our staff members strive to keep the forums organized and clutter-free. All of our offerings are free-of-charge with all costs offset by banner advertising. Premium offerings are available to improve your experience.

User Menu

Secure Browsing & Transactions

eLightbars.org uses SSL to secure all traffic between our server and your browsing device. All browsing and transactions within are secured by an SSL Certificate with high-strength encryption.