Lens, dome etc cleaning and polishing

ryan said:
i have used gas on a rag for my tar before.

Does gas tend to cloud the lenses? I have a clear XL dome with black spray paint droplets all over that I'd like to remove. Wondering if gas would o the trick.
 
There's a new product I just saw on one of my car shows... It called Nite-Shades Red... Basically its the same thing as Nite-Shades (which is used to tint headlights and tail lights charcoal color), but now in red... I think it would be a great way of getting some more life out of some red lenses/filters/domes... Sadly, its only comes in read though...


VHT Nite-Shades™ Red
 
I 26 said:
I've got some tar stuck on top of a dome - any idea what I can use to get it off before sanding?

I remove tar with WD40, but I have no idea what it will do to a dome. Works good on fenders.
 
I 26 said:
Anyone try toothpaste?


Yes I have, I found that the white (baking soda) toothpaste works the best. It also works well on polishing belt buckles and badges.
 
I just got a used patriot bar last night. The lenses aren't terrible but I would love to bring them back to the original beauty. What do you all recommend? :undecided:
 
Where can i get it? Im guessing a trip to wal-mart or auto part store would have them?
 
Short of the 3m HL kit, which I have one..... but, I've also got WS paper as well in 1500 and 2000 grit. I'd like to try both and am about to jump into the whole dome polishing trial and error and I'm still missing it after re-reading the whole thread.


How do you all keep the dome wet? I'd prefer to not have to lean over the bathtub for hours getting it done. So, wet the paper good, then use a spray bottle to keep the dome wet? I read somewhere about putting a drop of dish soap in?? Tips on this specifically?
 
rwo978 said:
Short of the 3m HL kit, which I have one..... but, I've also got WS paper as well in 1500 and 2000 grit. I'd like to try both and am about to jump into the whole dome polishing trial and error and I'm still missing it after re-reading the whole thread.

How do you all keep the dome wet? I'd prefer to not have to lean over the bathtub for hours getting it done. So, wet the paper good, then use a spray bottle to keep the dome wet? I read somewhere about putting a drop of dish soap in?? Tips on this specifically?

I keep my dome wet by resting them vertical in my kitchen sink. I put a clothe at the bottom of the sink to prevent scratches. The sink is half full of warmy-hot water. Let the sandpaper in the water a minute or so to get it wet and smooth before sanding. Spray/wet the dome, then put a few drops of liquid hand dish soap and spread it over the area to sand. What I do is dividing the whole dome in many working area to keep track of where I've been before. Sand each area for at least a minute per grit. After a minute, I rinse the dome section I'm working on to remove any buffed off particles and preventing scratches. When the whole dome is done for a grit, a repeat with the next finer grit and so on. It DOES take time, especially for domes which aren't rectangular and TwinSonic like.


Before switching to another grit, check the dome closely and inspect for the Scratch-pattern left by the sandpaper. It should be uniform. The finer grit you'll go, the less apparent the scratches will be, Although it's not possible to perfectly polish polycarbonate, with the proper method and finishing compound, it will look good enough.


Sometime, to really see if the sanding is well done, rinse the dome, dry it with a soft cloth, and check a ceiling light through it. A wet dome always look somewhat better than dry, thus making you think it's well sanded when it's actually not. You will also spot more easily any remaining scratches on a dry dome. When all scratches are removed, it's only a matter of elbow oil to gradually sand the dome grit by grit.


After 2000 wet-or-Dry sandpaper, I use this:


Micro-Mesh Finishing Kit


Then this:


MeguiarsDirect.com: PlastX Clear Plastic Cleaner & Polish using this: Mothers® PowerBall Mini®


I finish with Turtle Wax Platinum car wax.


Here's the results I got with this method.


http://elightbars.org/forums/f32/dome-polishing-95/index2.html#post137511


Again, it DOES take a while to achieve this method. :thumbsup:


Good luck; I hope this helps! :)
 
I used a micro fiber clothe with some megguires plast-X head light restore....looks pretty good, I think I will soak them in hot soapy water to give a good cleaning then follow up with another application of the plast-X
 
image.jpg


Comparison photo. Used the 3M kit. Worked great I think. Once I got the routine down it took no time at all to do.


ETA: Sorry it's upside down. I'm not smart enough to figure out how to fix it. You still get the point though.
 
Last edited by a moderator:
Which way is best when sanding out scratchs?


Going with the scratch or across it? :confused:


If going across then going the length of the dome?
 
Here's aone of the lates that I've done starting with 220-5000 grit wet/dry and Novus polish to finsh. Sold.

clear vista dome done 2.JPG
 
Captain4164 said:
My next question to this technique.

I have polished my headlights with the Mequires kit. It lasted about a year and a half, and now they are just as yellowed as before I did it. What do you do to prevent the domes from hazing again, or for that matter, the headlight lenses from going back to what they look like before??

I've heard about using a clear poly spray (clear coat) like you would on furniture/etc, I've tried it on a few I've had and so far, so good.


*Edit: I realize he asked the question long ago, and probably isnt relevant to him by now, my reply was solely geared towards helping the masses*
 
Last edited by a moderator:
Rattle can automotive clear coat.
 
So I've got a bunch of Vector domes to do and some of them are in pretty bad shape while others just need a touch-up. I'm starting with a clear one that's got some decent scratches in it and some black "stuff" stuck to it. Started with a VERY light pressure with 120 to remove the black "stuff" and what was probably once a dragonfly or similar. From there I moved on to 180, 220, 320, and I just finished a light wet sanding with 400. So far the dome looks worse then before I started with the exception of the lack of black stuff and the bug remains... I'm starting to think I was WAY too rough on the initial grit selection. I'll be heading out to the store tomorrow to pick up much finer grit paper and a 3M kit and see if these can be saved. I'm also taking photos as I go to document my progress or lack there of. I hope to have those uploaded and posted soon. :bonk:
 
foxtrot5 said:
So I've got a bunch of Vector domes to do and some of them are in pretty bad shape while others just need a touch-up. I'm starting with a clear one that's got some decent scratches in it and some black "stuff" stuck to it. Started with a VERY light pressure with 120 to remove the black "stuff" and what was probably once a dragonfly or similar. From there I moved on to 180, 220, 320, and I just finished a light wet sanding with 400. So far the dome looks worse then before I started with the exception of the lack of black stuff and the bug remains... I'm starting to think I was WAY too rough on the initial grit selection. I'll be heading out to the store tomorrow to pick up much finer grit paper and a 3M kit and see if these can be saved. I'm also taking photos as I go to document my progress or lack there of. I hope to have those uploaded and posted soon. :bonk:

1000, 1500, 2000, 2500, polisher


DSCN0347.jpg


If you want, you can do 3000 before polishing, but it never really made that big of a difference for me.


I've done the Vector/Vision domes, Liberty and Freedom domes, Starbar Domes, and headlights with this same practice. I use Mother's PowerPlastic 4 Lights and a variable speed sander/polisher with pads that can be obtained from Lowe's.
 
I bought some new clear vision domes on eBay, but they had some deep scratches on the inside. I sanded most of them out with 1500 followed by 2000. Are there any round buffer pads out there that I can put on a drill to buff out the inside easier?


The domes are going on a car I'm restoring so I wanted them as nice as possible
 
Reno911 said:
I bought some new clear vision domes on eBay, but they had some deep scratches on the inside. I sanded most of them out with 1500 followed by 2000. Are there any round buffer pads out there that I can put on a drill to buff out the inside easier?
The domes are going on a car I'm restoring so I wanted them as nice as possible
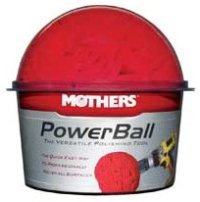
Try this fits on a drill. Mothers Original PowerBall Polishing Tool enables you to polish metal, plastic & painted surfaces using your electric drill! Mothers PowerBall is made
 
Reno911 said:
I bought some new clear vision domes on eBay, but they had some deep scratches on the inside. I sanded most of them out with 1500 followed by 2000. Are there any round buffer pads out there that I can put on a drill to buff out the inside easier?
The domes are going on a car I'm restoring so I wanted them as nice as possible

A Mother's Powerball is probably your best bet. I've done interiors of domes and lenses with it and the results are good. Check Walmart first before going to an auto parts store. They are usually cheaper there.


awww.carcarecolorado.com_mothers_power_ball.jpg
 
Has anyone wetsanded the inside of a dome? I had a couple domes where mirrors or whatever rubbed, so I 'worked' it out. Now, the finish doesn't seem to want to get clear. Just keep working on it?
 
rwo978 said:
Has anyone wetsanded the inside of a dome? I had a couple domes where mirrors or whatever rubbed, so I 'worked' it out. Now, the finish doesn't seem to want to get clear. Just keep working on it?

Ryan,


Was going to post the same ? but see you already have if no answers through here going to post on regular forum to get quicker answers.
 
Haven't heard anything back. Would really like to get some pics of the Mini Solaris WITH the dome. Guess I'll have to try and find some time to tinker with it.
 
The 3m headlight restorer kits work good. If by some reason you run out of the compound in that kit you can use any good commercial body compound.
 
I needed a clear section of Freedom/9M lens for a build, and all I had was some old yellowed sections I bought a while ago. So I figured I'd try the 3M kit. Only took about 25 minutes total.


Initial:


ai171.photobucket.com_albums_u298_PJD642_th_IMG_20140304_105428_zps7a70baa7.jpg


After stage 1 (500 grit pad):


ai171.photobucket.com_albums_u298_PJD642_th_IMG_20140304_111035_zps8867ba27.jpg


After stage 2 (800 grit pad):


ai171.photobucket.com_albums_u298_PJD642_th_IMG_20140304_111854_zps82a312cd.jpg


After stage 3 (3000 grit pad):


ai171.photobucket.com_albums_u298_PJD642_th_IMG_20140304_114351_zps523e74c5.jpg


And finally after rubbing compound & protectant wax:


ai171.photobucket.com_albums_u298_PJD642_th_IMG_20140304_113850_zpscacd41a3.jpg


I was beginning to worry after stage 2, since it didn't appear to be improving much, but the finishing pad really cleaned it up nice. This stuff is WELL worth the money it cost ($30 at autozone, with a $15 rebate if purchased by the 10th of March). It was $30 because it had the protectant wax & something else the regular kit didn't have.
 
Just got the 3M kit... I hand wet sanded the bar already with a 1,000 & 2,000 grit now I am about to do the 3m kit.


QUESTION: When doing the first two phases with the 3M kit (500 & 800 I think) do I spray the lense wet or do it dry?? Only time I see they say to spray it is step pad 3.
 
fireman616wfd said:
Just got the 3M kit... I hand wet sanded the bar already with a 1,000 & 2,000 grit now I am about to do the 3m kit.

QUESTION: When doing the first two phases with the 3M kit (500 & 800 I think) do I spray the lense wet or do it dry?? Only time I see they say to spray it is step pad 3.

I used the 3M kit a lot and I always wet the pads: 500, 800, trizact 3000. If you don't wet them, they will clog up with particles fast and wear out much faster while doing a lesser job at it.


Also, when you see a film of lens "paste" accumulating, wipe it down and wash the dome clean to work on a clean surface.


The only steps I don't wet the pads is, of course, when you are doing the final buffing with the foam pad and the compound.


Hope this helps.
 
Is wet sanding the only way? It will be my first try, and can't replace the dome.


Up and down, side to side, both, or in circular motions.


I could use some advise.


Thanks

$_57 (1).jpg

$_57 (2).jpg
 
dmathieu said:
Is wet sanding the only way? It will be my first try, and can't replace the dome.
Up and down, side to side, both, or in circular motions.


I could use some advise.


Thanks
Pm sent
 
dmathieu said:
Is wet sanding the only way? It will be my first try, and can't replace the dome.
Up and down, side to side, both, or in circular motions.


I could use some advise.


Thanks

Wet sanding yields better results, Otherwise you will waste sandpaper and end up gouging out your dome. Use circular motion, and constantly move in a uniform direction, if not, you'll end up with scratches way too deep to remove in later finer grit sanding. I've done a few with about 4 different grit level and I hey ended up looking damn near perfect. I usually start with a 300, then 800, then 2000, then a 3000. Always remember to keep your surface wet, can't stress that enough.
 
Pfire472 said:
Wet sanding yields better results, Otherwise you will waste sandpaper and end up gouging out your dome. Use circular motion, and constantly move in a uniform direction, if not, you'll end up with scratches way too deep to remove in later finer grit sanding. I've done a few with about 4 different grit level and I hey ended up looking damn near perfect. I usually start with a 300, then 800, then 2000, then a 3000. Always remember to keep your surface wet, can't stress that enough.

Really remind me not to have you do any body work or wood work.


If you like swirls in your work.


You always sand in the same direction. If at all possible.


And skipping grits like you do will not get the 800 scratches out by jumping that far up the grit line.


I've got 180, 220, 240, 280, 320, 360, 400, 500, 600, 800, 1000, 1200, 1500, 2000, 2500, 3000, 4000, and 5000.


And I've been doing this long enough all I do is look at the job and can determine which grit I should start with.


And when I'm done I use Novus to polish it out. With a Craftsmen orbital polisher 2400 OSC/min
 
Has any one used the magic eraser thing at all I seen on another forum were some one did it but they never posted pics?
 
Has any one used the magic eraser thing at all I seen on another forum were some one did it but they never posted pics?
I did it on the inside of clear AeroDynic domes that looked covered in soot and baked in by the California sun. Worked remarkably well. I must say it was only cleaning, and not removing scratches. Also, note that the magic eraser is somewhat finely abrasive so it will leave minor scratches, though you'd have to look really closely to see them.

After the magic pad, I buffed with Past-X and powerball to ge the shine back.

all in all, the magic eraser works well for cleaning only, and not for scratches
 

Forum Statistics

Threads
55,052
Messages
454,071
Members
19,665
Latest member
Pihoffman